
Once you want to stitch a design that didn’t come printed on the fabric, you need a way to get the lines from paper onto cloth. There are several methods, and the right one depends on your fabric: light or dark, thin or thick, flat or already sewn into a tote bag or jacket. Here are five that work well for beginners, and when to use each.
How to transfer an embroidery design to fabric
For light cotton or linen, tape the printed design behind the fabric and trace it with a water-soluble fabric pen using a window or light pad. For dark or thick fabric, use light-colored transfer paper or water-soluble stick-and-stitch stabilizer. For denim, totes, T-shirts or other finished items, stick-and-stitch is usually the easiest because you stitch directly through the printed sheet and rinse it away afterward.
The goal is the same with every method: make a thin, accurate line that stays visible while you stitch but can be removed or completely covered when the piece is finished.
Before you start
- Wash and iron your fabric first if it’s something you’ll wash later, like clothing. It removes sizing and pre-shrinks it.
- Tape everything down. Whatever method you use, tape the pattern and fabric so nothing shifts while you trace.
- Draw lines thin. Your stitches need to cover them. Thin, light lines are much easier to hide than thick ones.
- Test your pen or paper on a scrap of the same fabric, including how it washes or irons off.
Method 1: Trace with a light source
Best for: light, thin fabrics like cotton, linen and cotton blends.
- Print or draw your pattern on regular paper.
- Tape the pattern to a bright window or a light pad (a tablet with a white screen at full brightness also works).
- Tape your fabric over the pattern, centered.
- Trace the lines with a water-soluble fabric pen or a sharp pencil.
Pros: cheap, accurate, no special supplies beyond a pen.
Cons: doesn’t work on dark or thick fabric, because you can’t see the lines through it.
Water-soluble pens rinse out with cool water after stitching. Pencil doesn’t wash out easily, so press lightly and make sure your stitches will cover every mark.
Method 2: Embroidery transfer paper (carbon paper)
Best for: medium-weight fabric and fabric you can’t see through.
Transfer paper works like old-fashioned carbon paper, made for fabric. It comes in colors, including white for dark fabric.
- Lay your fabric flat on a hard surface, right side up.
- Place the transfer paper on top, colored side down.
- Put your printed pattern on top and tape all three layers.
- Trace firmly over every line with a stylus, a ballpoint pen or a dry pen.
- Lift a corner to check the lines are coming through before you remove everything.
Pros: works on dark fabric with light-colored paper, reusable sheets, no light source needed.
Cons: lines can smudge while you stitch, and some papers leave marks that don’t fully wash out. Always read the removal instructions and test first.
Method 3: Water-soluble stabilizer (stick and stitch)
Best for: dark fabric, thick fabric, stretchy fabric and finished items like tote bags, denim jackets, hats and T-shirts.
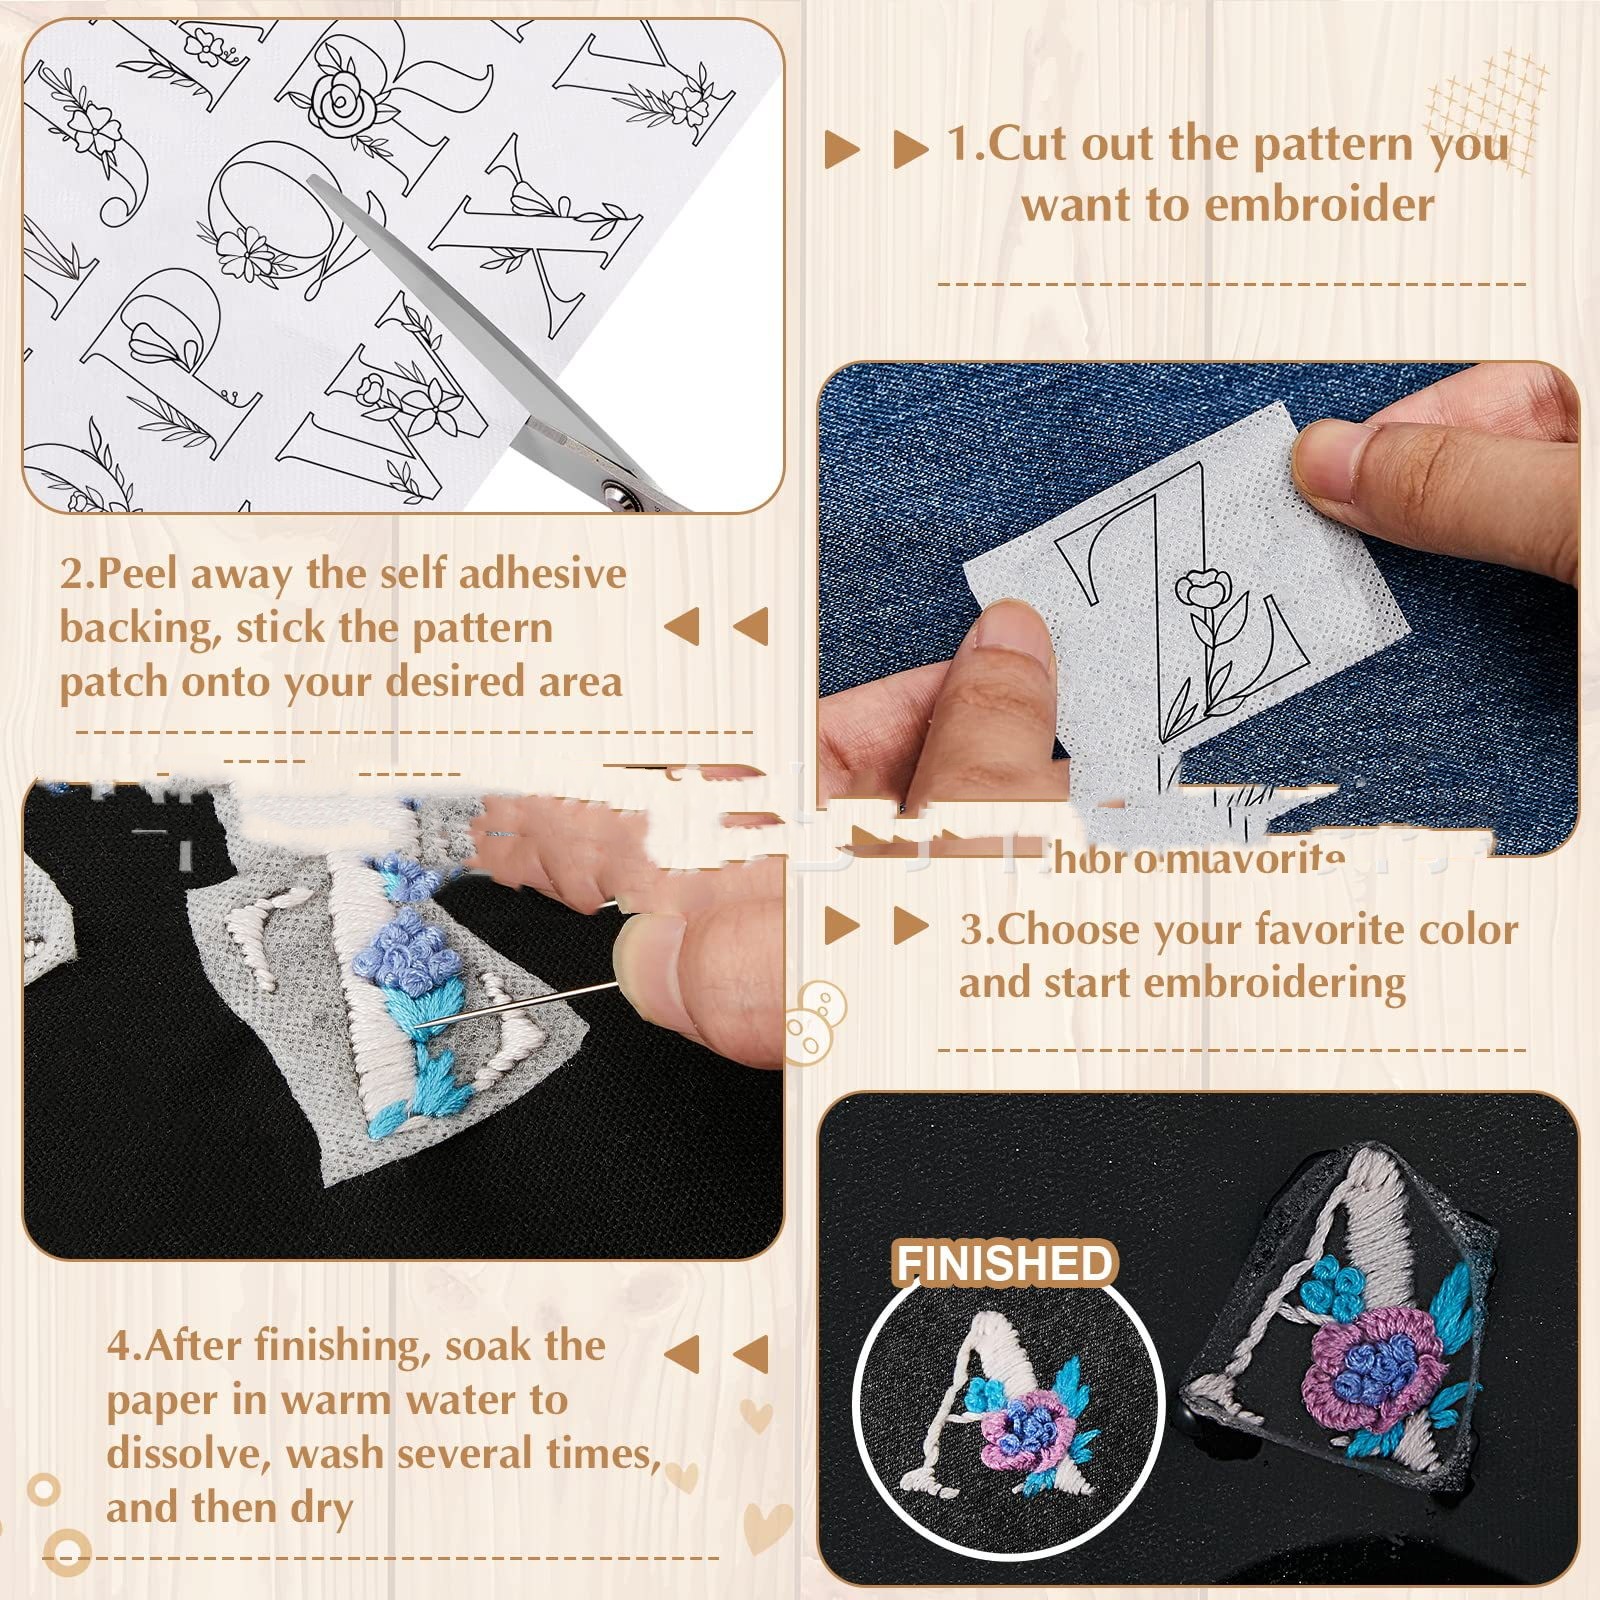
This is the easiest method for anything you can’t trace through. The pattern is printed on a thin, sticky, water-soluble sheet.
- Cut out the motif you want.
- Peel off the backing and press it onto your fabric. Smooth it down.
- Stitch right through the sheet and the fabric, following the printed lines.
- When you finish, soak the piece in warm water. The stabilizer dissolves and washes away, leaving only your stitches.
Pros: no tracing at all, works on any color and texture, adds a little stability to stretchy knits.
Cons: the needle can get slightly sticky on big projects (wipe it now and then), and the piece needs a soak at the end, so both the fabric and floss must be OK with water.
You can buy blank sheets and print your own designs on them with an inkjet printer, or buy pre-printed ones. Our stick-and-stitch embroidery patterns are pre-printed flowers, grass and leaves on self-adhesive, water-soluble sheets, sized for totes, denim and tees.
A tip for soaking: rinse in warm water for several minutes, gently rubbing the back, then change the water and rinse again. Any stabilizer left in the fabric dries a little stiff.
Method 4: Iron-on transfer pens and pencils
Best for: making several copies of the same design on light fabric.
- Trace your pattern onto paper with a heat-transfer pen or pencil. The design will be mirrored when you iron it, so trace it reversed if it includes letters.
- Place the paper ink-side down on your fabric.
- Press with a hot iron (don’t slide it) for the time the pen’s instructions give.
Pros: one tracing can often be ironed more than once.
Cons: most iron-on lines are permanent, so your stitches must cover them fully. Not a good choice for designs you might change.
Method 5: Heat-erasable pens
Best for: light fabric, when you want lines to disappear without washing.
Some gel pens fade when heated. Trace your design, stitch, then touch a warm iron or hair dryer to the lines and they vanish.
Pros: no washing needed, clean finish.
Cons: the ink can reappear as faint ghost lines if the fabric gets very cold, and heat can leave a pale mark on some dark fabrics. Test on a scrap first.
Which method should you choose?
- Light cotton or linen: trace with a light source and a water-soluble pen.
- Dark fabric: white transfer paper or stick-and-stitch stabilizer.
- Tote bags, denim, hats and T-shirts: stick-and-stitch stabilizer.
- The same design many times: iron-on transfer pen.
- Don’t want to transfer at all: a kit with the design already printed on the fabric.
Every one of our beginner embroidery kits comes with the design pre-printed, so you can skip this step completely for your first projects.
Tips for clean results
- Stitch just inside the lines so they’re fully covered, especially with permanent methods.
- Don’t iron over water-soluble or heat-erasable marks before you’re done: heat can set water-soluble ink, and it erases heat-erasable ink before you’ve stitched.
- Keep patterns simple at first. Fewer lines means less to cover, and the basic embroidery stitches are all you need to follow them.
- Lettering: check that it reads correctly on the fabric before you stitch. Mirrored text is the most common transfer mistake.
FAQ
How do I transfer an embroidery design to fabric?
On light fabric, place the paper design behind the fabric and trace it with a water-soluble pen over a window or light pad. On dark or thick fabric, use transfer paper or stick-and-stitch stabilizer. For a finished tote, jacket or T-shirt, stick-and-stitch is usually the easiest option.
What is the easiest way to transfer an embroidery pattern?
On light fabric, tracing over a window or light pad with a water-soluble pen. On dark or thick fabric, stick-and-stitch water-soluble stabilizer, because there’s nothing to trace.
How do I transfer an embroidery pattern onto dark fabric?
Use white or yellow transfer paper, or print the pattern on water-soluble stabilizer, stick it on and stitch through it. Tracing with a light source won’t work on dark fabric.
Does embroidery transfer paper wash out?
Many transfer papers are designed to wash or brush out, but it varies by brand and color. Read the instructions and test on a scrap of your fabric before starting.
How do you remove water-soluble stabilizer?
Soak the finished piece in warm water for several minutes, gently rubbing the back, then rinse in fresh water. Let it dry flat.
Can I use a regular pencil to transfer an embroidery pattern?
Yes, on light fabric, as long as you press lightly and your stitches cover every line. Pencil doesn’t wash out easily.
Why is my transferred design backwards?
Iron-on transfers reverse the image. Trace letters and asymmetrical designs mirrored on the paper so they come out the right way on the fabric.