
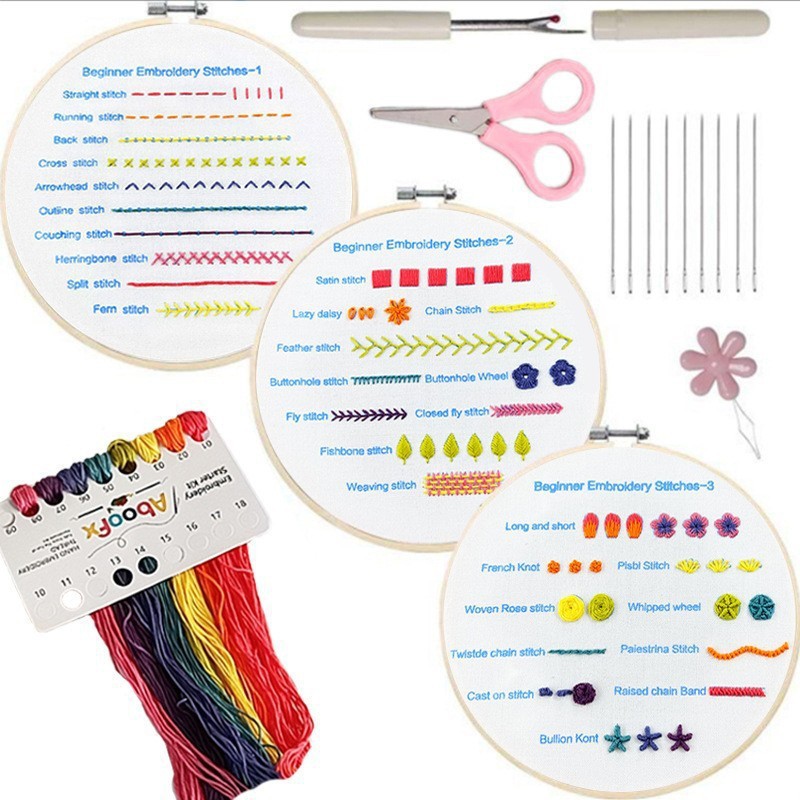
There are hundreds of embroidery stitches, but you only need a handful to stitch almost any beginner pattern. Learn these eight and you’ll be able to outline, fill, and decorate flowers, leaves, animals and lettering.
This guide explains each stitch step by step, what it’s best used for, and the most common mistake to watch out for. Grab a hoop, a scrap of cotton fabric and some floss, and practice each one in a short row. A practice sampler is the fastest way to build muscle memory.
The 8 basic embroidery stitches at a glance
The eight basic stitches worth learning first are running stitch, back stitch, split stitch, stem stitch, satin stitch, chain stitch, lazy daisy and French knot. Together they cover the three jobs most beginner patterns need: drawing clean lines, filling shapes, and adding flowers, dots or texture.
- Running stitch: simple dashed lines and borders.
- Back stitch: solid outlines, lettering and fine detail.
- Split stitch: textured outlines and a neat base for filled shapes.
- Stem stitch: smooth curved lines, stems and vines.
- Satin stitch: solid fills for petals, leaves and small shapes.
- Chain stitch: bold looped lines and decorative borders.
- Lazy daisy: quick petals and small leaves.
- French knot: raised dots, flower centers and tiny details.
If you are learning from zero, start with back stitch, satin stitch, lazy daisy and French knot, then add the other four. The step-by-step instructions below show how each one works.
Before you start: a quick setup
- Hoop your fabric tightly. It should feel firm like a drum. Loose fabric makes every stitch harder.
- Use about 18 inches of floss. Longer pieces tangle.
- Start with three strands of six-strand floss. It’s thick enough to see clearly and thin enough to be neat.
- Use an embroidery (crewel) needle. The long eye makes threading easy.
A quick note on words: “come up” means bring the needle from the back of the fabric to the front. “Go down” means push it from the front to the back.
If you’re brand new, our how to embroider guide covers hooping, threading and finishing in more detail.
Outline stitches
Outline stitches make lines. You’ll use them for stems, borders, lettering and the edges of shapes.
1. Running stitch
The simplest stitch of all, and a good warm-up.
- Come up at the start of your line.
- Go down a short distance along the line (about 1/8 to 1/4 inch).
- Come up again the same distance further along, leaving a gap.
- Repeat, keeping stitches and gaps even.
Best for: dashed lines, simple borders, sashiko-style patterns, gathering fabric when finishing a hoop.
Watch out for: uneven gaps. Try to make each stitch and each gap the same length. It doesn’t have to be perfect; it just has to be consistent.
2. Back stitch
A clean, solid line and the stitch you’ll use most often.
- Come up one stitch length ahead of the start of your line.
- Go down at the very start of the line (you’re stitching backward).
- Come up one stitch length ahead of your first stitch.
- Go down into the end of the previous stitch, sharing the same hole.
- Repeat.
Best for: outlines, fine details, lettering.
Watch out for: stitches that are too long on curves. Shorten your stitches as the line bends, and the curve will look smooth instead of jagged.
3. Split stitch
Split stitch looks like a thin, braided rope and makes a slightly thicker line than back stitch.
- Make one straight stitch along your line.
- Come up in the middle of that stitch, piercing right through the floss so it splits.
- Go down a stitch length ahead.
- Come up through the middle of the new stitch and repeat.
Best for: textured outlines, and as an edge under satin stitch (it gives the fill a raised, crisp border).
Watch out for: missing the split. Use an even number of strands (two or four) so it’s easy to split the thread right down the middle.
4. Stem stitch
A twisted, rope-like line that looks lovely on curves. It’s the classic choice for flower stems.
- Come up at the start of your line.
- Go down a stitch length ahead, but don’t pull tight yet: leave a small loop.
- Come up halfway back along that stitch, just to one side of it.
- Pull the thread snug.
- Go down a stitch length ahead again, and come up at the end of the previous stitch.
Best for: stems, vines, curvy outlines, lettering.
Watch out for: switching sides. Always keep the working thread on the same side of the line (for example, always below it). If you switch, the twist changes direction and looks messy.
Fill stitch
5. Satin stitch
Satin stitch fills a shape with smooth, shiny, parallel stitches. It’s the stitch that makes flower petals and leaves look finished.
- Come up on one edge of the shape.
- Go down directly across on the opposite edge.
- Come up right next to your first stitch, on the same side you started.
- Repeat, laying each stitch snugly beside the last.
Tips for a smooth satin stitch:
- Start in the middle of the shape and work out to one edge, then return to the middle and work out to the other. This keeps your angle consistent.
- Outline the shape with split stitch or back stitch first, then satin stitch over it. The edge will look crisper.
- Keep shapes small. For areas wider than about half an inch, long stitches can snag. Use long and short stitch, or break the shape into sections.
- Use fewer strands (two or three) for a smoother surface.
Watch out for: gaps between stitches and fabric showing through. Place each stitch right against the last one, and don’t pull too tight.
Decorative stitches
6. Chain stitch
A line of linked loops, like a little chain. It looks bold and textured.
- Come up at the start of your line.
- Go down back into the same hole (or right beside it), but don’t pull all the way through: leave a small loop on top.
- Come up a stitch length ahead, inside the loop.
- Gently pull to snug the loop around the thread.
- Go down again in the same hole you just came up from, leaving a new loop, and repeat.
- To finish, make a tiny stitch over the last loop to hold it in place.
Best for: bold outlines, lettering, borders, and filling shapes with rows of chains.
Watch out for: pulling loops too tight. They should look round and open, not squashed.
7. Lazy daisy (detached chain stitch)
The lazy daisy is a single chain loop held down with a tiny stitch. Make several in a circle and you have a daisy.
- Come up at the base of your petal.
- Go down into the same hole, leaving a loop.
- Come up at the tip of the petal, inside the loop.
- Pull gently so the loop forms a petal shape.
- Go down just outside the loop at the tip to anchor it with a tiny stitch.
- Come up at the base of the next petal.
Best for: flower petals, small leaves, and quick decorative details.
Watch out for: anchoring stitches that are too long. Keep the tiny tie-down stitch short so the petal keeps its rounded shape.
8. French knot
Small, raised dots. They’re perfect for flower centers, eyes and little berries. They also have a reputation for being tricky, but a few tries is usually all it takes.
- Come up where you want the knot.
- Hold the thread taut with your non-needle hand.
- Place the needle against the thread and wrap the thread around the needle once or twice.
- Keeping the thread taut, put the needle tip back into the fabric very close to where you came up (not in the same hole, or the knot may pull through).
- Slide the wraps down the needle so they sit against the fabric.
- Push the needle through to the back slowly, still holding the thread gently, until the knot forms.
Best for: flower centers, dots, texture.
Watch out for: loose, floppy knots. The key is keeping tension on the thread while you pull the needle through. For a bigger knot, use more strands rather than more wraps.
How to practice: make a stitch sampler
The quickest way to learn is a stitch sampler. Draw eight short lines and a few small shapes on a piece of fabric, one for each stitch, and fill them in order. Label them with a fabric pen if you like. You’ll finish with a handy reference you can look at later.
If you’d rather skip the drawing, a practice kit with a printed design does the same job. Our stitch sampler kit has the stitch name printed beside each row, from running and back stitch to lazy daisy, fishbone and French knots, with the floss, needles and an 8-inch hoop included.
Which stitches to learn first?
If you only have one evening, learn them in this order:
- Back stitch for outlines
- Satin stitch for filling
- Lazy daisy for petals
- French knot for centers and dots
With just those four, you can finish most simple flower designs. Our wildflower embroidery kit uses exactly these stitches, so it’s a nice first project after your sampler. Then add running, split, stem and chain stitch as you go.
FAQ
What are the 8 basic embroidery stitches?
Running stitch, back stitch, split stitch, stem stitch, satin stitch, chain stitch, lazy daisy and French knot. Those eight cover simple outlines, solid fills, petals, leaves and textured details, so they are enough for most beginner embroidery patterns.
What is the easiest embroidery stitch for beginners?
Running stitch. It’s a simple up-and-down dashed line. Back stitch is the next easiest and the most useful, because it makes the solid outlines most patterns need.
How many embroidery stitches do I need to know?
Not many. The eight stitches in this guide cover outlines, fills and decorative details, which is enough for almost every beginner pattern.
What’s the difference between stem stitch and split stitch?
Both make textured lines. Stem stitch overlaps stitches side by side for a twisted, rope-like look. Split stitch comes up through the middle of the previous stitch, which looks more like a braid or chain.
Why do my French knots pull through the fabric?
Usually because the needle goes back down in the exact same hole it came up from. Go down just next to it, one or two fabric threads away, and keep the thread taut as you pull through.
How many strands should I use for each stitch?
A good default is two or three strands for outlines and satin stitch, and two to three strands for French knots. Use an even number for split stitch so it’s easy to split. Always follow your pattern if it says otherwise.
Why does my satin stitch look messy?
Most often the stitches are spaced too far apart, too long, or at different angles. Keep stitches close together, outline the shape first, and start in the middle so the angle stays consistent.