
No, embroidery is not hard to start. You only need to learn a handful of simple stitches, and a pre-printed kit shows you exactly where to put them. What takes practice is keeping your tension even and your floss untangled, and both improve quickly.
So is embroidery hard? It is one of the easier needlecrafts to begin, as long as you pick a beginner-level project. This guide explains what is easy, what trips beginners up and how to choose a first kit that suits you. If you are still comparing crafts, see our cross stitch vs embroidery vs punch needle guide.
Is embroidery hard for a complete beginner?
The physical skills are small. You thread a needle, bring it up through the fabric and take it back down. Nearly every beginner design is made from four or five stitches repeated many times.
Most people find the first few rows awkward and then settle into a rhythm. That is normal, and it does not mean you are bad at it. Our how to embroider guide takes you from setting up the hoop to finishing your first piece.
What is actually easy about embroidery
- You do not need a drawing skill. Kits have the design pre-printed on the fabric, so you only follow the lines.
- The tools are simple. A needle, floss, a hoop and small scissors cover it.
- Mistakes can be undone. You can snip and pull out stitches, and the fabric usually recovers.
- You can stop and start. Put the hoop down mid-project and pick it up later, with no drying time or setup.
- You can start small. A 4 to 6 inch project is a modest commitment.
What beginners find hard
Nobody expects this part, so it helps to know what is coming.
Even tension
Pulling stitches too tight puckers the fabric, and leaving them too loose makes them look sloppy. A drum-tight hoop and a gentle pull help a lot. Our how to use an embroidery hoop guide shows how to set the fabric properly.
Tangled floss
Six-strand floss is easy to tangle if you use very long pieces or pull it roughly. Cutting shorter lengths and separating the strands gently makes life easier. Our embroidery floss guide explains how it works.
Filling shapes smoothly
Satin stitch, used to fill shapes, looks simple but needs neat, parallel stitches with no gaps. It usually takes a couple of tries before it looks smooth. Practice on a small shape first.
French knots
These small knots look tricky, and many people need a few attempts before they get the wrap and tension right. They are tiny, so a wobbly one is easy to redo, and they add a lot of charm.
Patience with dense designs
Designs with blended colors or fine detail take more time and attention. That is a matter of patience, not a special skill, and it is a good reason to build up gradually.
How to choose a first kit that is not hard
Look at the skill level, the finished size and the stitches used. Our beginner embroidery kits list all three, so you can compare.
Beginner-level kits
- Wildflower Line-Art Embroidery Kit: beginner level, back stitch, stem stitch, lazy daisy, satin stitch and French knots, with lots of open space. An 8 inch hoop is included.
- Lemons, Cherries and Strawberries Embroidery Kit: beginner level, with simple shapes, bold colors and only satin stitch, back stitch and straight stitch.
- Celestial Sun and Moon Embroidery Kit: beginner level, with the floss pre-sorted on a thread board, so you spend less time hunting for colors.
- Mushroom Embroidery Kit: beginner level, with an 8 inch hoop included.
Save these for later
Some kits are rated advanced beginner for good reasons: the Aurora and Starry Night kit has dense color blending in the sky, the Mountain and Wildflowers kit has shading on the peaks, and the Jellyfish kit has fine tentacle lines on dark fabric. They are lovely, but they are a step up from a first project. Come back to them after one or two simple hoops.
Want to learn before you commit to a picture?
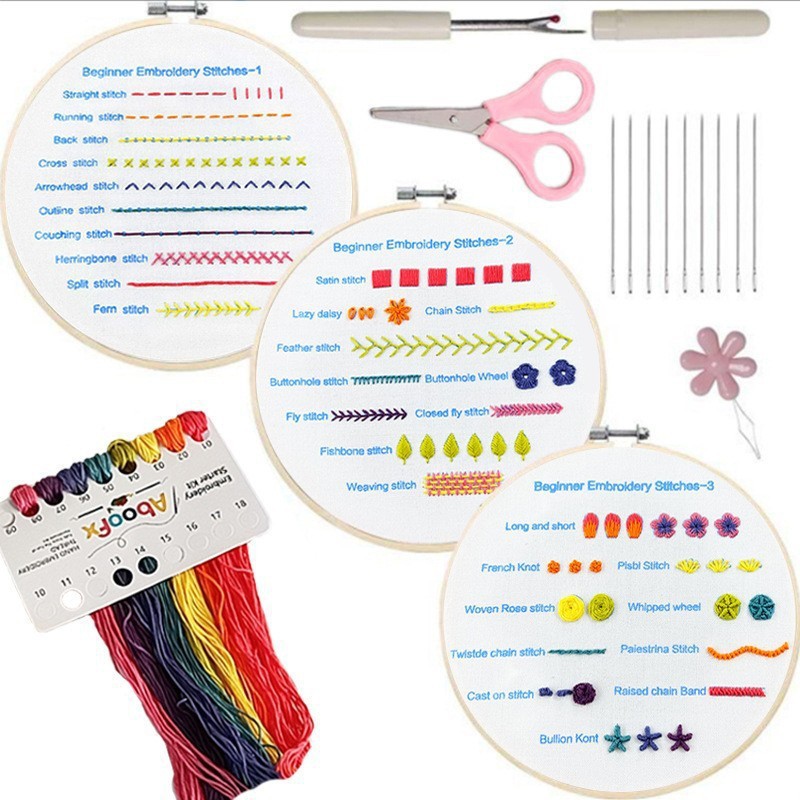
The Stitch Sampler Embroidery Kit is made for people who have never stitched. It has three pre-printed practice fabrics, with the stitch name printed beside each row, plus a hoop, scissors, a needle threader and a seam ripper. It is a calm way to build skill without worrying about ruining a picture. You can browse more in our stitch sampler kits.
A simple plan for your first hoop
- Pick a beginner-level kit with a design you would happily hang up.
- Set the fabric drum-tight in the hoop, then check it again after a few stitches.
- Cut floss to about the length from your fingertips to your elbow.
- Start with the easy stitches, such as back stitch, before you try knots or fills.
- Work in short sessions. Fifteen to thirty minutes is plenty at first.
- Do not judge your work until the hoop is done. Stitches that look rough up close often look fine from a normal distance.
Time worries many beginners, too. Our guide on how long an embroidery kit takes gives typical ranges and a simple way to estimate your own pace.
Is embroidery hard to learn compared to other crafts?
It has a lower barrier than many crafts, because you need very few tools and there is no complicated setup. Compared with cross stitch, you do not need to count squares. Compared with punch needle, you do not need to keep loops at one height. Each craft has its own learning curve, so the best pick is the one you enjoy.
FAQ
How long does it take to learn embroidery?
Most people can learn the basic stitches in an afternoon. Neat, confident stitching takes a few projects. A practice sampler is a fast way to build the habit.
Is embroidery hard on your hands or eyes?
It is a fine-detail craft, so good light and regular breaks help. Sit comfortably and rest your eyes and hands from time to time. If you have a health concern, ask your doctor.
Can I teach myself embroidery?
Yes. Many people learn from a written guide and a kit. Every Shop Tattitude kit comes with access to our free step-by-step English beginner guide on our blog.
What is the hardest embroidery stitch?
Many beginners find French knots and satin stitch fills hardest at first, because both depend on even tension. Bullion knots are also known as tricky. All of them get easier with practice.
What if I make a mistake?
You can remove stitches with small scissors or a seam ripper and redo them. A seam ripper is included in our stitch sampler kits and in the Mountain and Wildflowers kit.